TL, DR
During the development of Docker applications you may need to continuously pull and build images. A local Docker registry can help you to save time and effort, especially if your Internet connection is not the fastest in the world. The GUI by joxit helps to make this local Docker registry more user friendly for beginners.
Docker Registry
A Docker Registry is a place from where you can pull images for building your own personalized ones, and where you can store finished and semi-finished images.
It makes sense to keep a local registry for development, especially if you need to iterate a lot and you want to build intermediate images in your development process, to avoid time and network issues when installing dependencies, etc.
Luckily Docker offers a great Open Source registry, with the same capabilities of the standard Docker Hub. However, the official registry image lacks a GUI.
While this is not a problem for experienced users, many beginners would appreciate the possibility to have something more user friendly to explore their local images.
joxit Registry GUI
This Open Source project by joxit provides a very effective GUI for your private Docker Registry. This project has plenty of options to configure a secure interface for public deployments. However, we will just show how to set up a simple one for your local computer. This is mainly aimed to local Docker applications development.
Deploy your Docker local registry with a GUI
Environment Setup
You will need to install Docker and Docker Compose on your computer in order to follow this tutorial. You will need to have access to a UNIX terminal (WSL will work fine if you are on Windows), and you need your favorite code editor to write a few configuration files.
The first step if to create a new project directory for this project. You can see the end result at the Github repository in the related links section below.
Docker Compose file
To setup the Docker local Registry and its GUI we will need to spin up two Docker containers. While we could spin them up separately with their own configuration, Docker Compose is a much better option to keep things tidy and easily repeatable.
The Docker Compose file is the following:
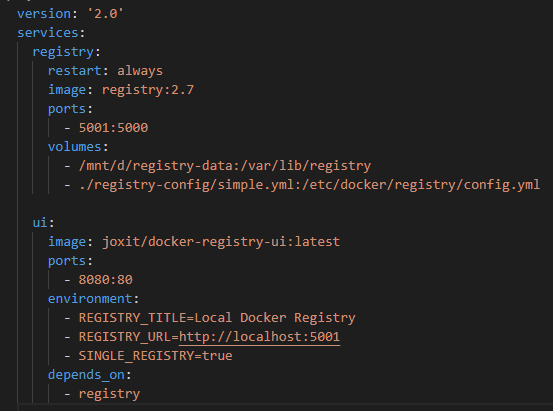
version: "2.0" indicates the Docker Compose version to be used to interpret the configuration.
services section is where you can list the containers you want to spin up (in this case registry and ui), each one with its configuration.
registry contains the configuration for our Docker local registry:
restart: alwaysmeans that Docker will automatically restart the container in case of an errorimage: registry:2.7indicates which image we want to deployports: 5001:5000indicates that we will publish the container port 5000 on the host port 5001volumessection indicates the bindings between containers’ directories and the host ones, useful to have persistent storage (first binding) and to pass further configuration files (second binding)
ui specifies the configuration for our Docker local registry GUI:
image: joxit/docker-registry-ui:latestindicates which image we want to deployports: 8080:80indicates that we will publish the container port 80 on the host port 8080environmentsection list a set of environment variables that we will set on the container:- Amongst them,
REGISTRY_URL=http://localhost:5001indicates where is the Docker local registry to which we want to provide a GUI
- Amongst them,
depends_on: registryindicates that this image will wait for theregistrycontainer availability before spinning up
Note that both containers are attached to the standard bridge network (we did not specify anything different). If you want to use a dedicated network, you can use the Docker Compose file to create it and attach the two containers upon creation.
Registry configuration file
When we launched the registry container above, we specified that the file in ./registry-config/simple.yml will be copied in the container. That file contains the configuration parameters for the Docker local registry container.
So let’s create the sub-directory registry-config in our project folder and the simple.yml file inside it with the following content:
version: 0.1
log:
  fields:
    service: registry
storage:
  delete:
    enabled: true
  cache:
    blobdescriptor: inmemory
  filesystem:
    rootdirectory: /var/lib/registry
http:
  addr: :5000
  headers:
    X-Content-Type-Options: [nosniff]
    Access-Control-Allow-Origin: ['http://localhost:8080']
    Access-Control-Allow-Methods: ['HEAD', 'GET', 'OPTIONS', 'DELETE']
    Access-Control-Allow-Headers: ['Authorization', 'Accept']
    Access-Control-Max-Age: [1728000]
    Access-Control-Allow-Credentials: [true]
    Access-Control-Expose-Headers: ['Docker-Content-Digest']
Launching
Once all is done, you can open the UNIX terminal in your project main folder and enter the following command:
docker-compose -f simple.yml up -dThis will pull the images from Docker Hub and launch the local containers. After the command is completed we can see the result typing:
docker psThis command will list all running Docker containers. Here the result I got:

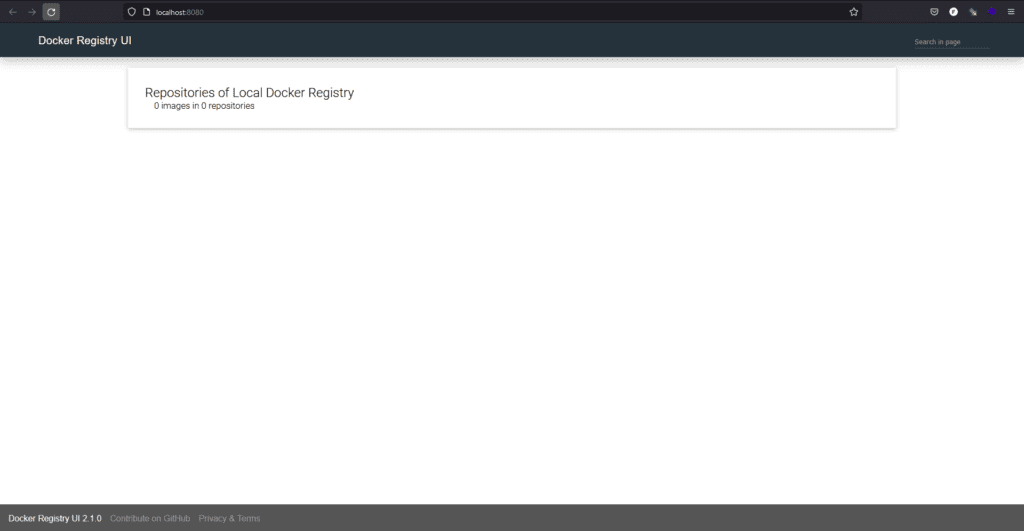
We can open our browser and navigate to 0.0.0.0:8080 (or localhost:8080) and we will see the GUI for our Docker local registry. It will be empty, as we haven’t yet put any image there.
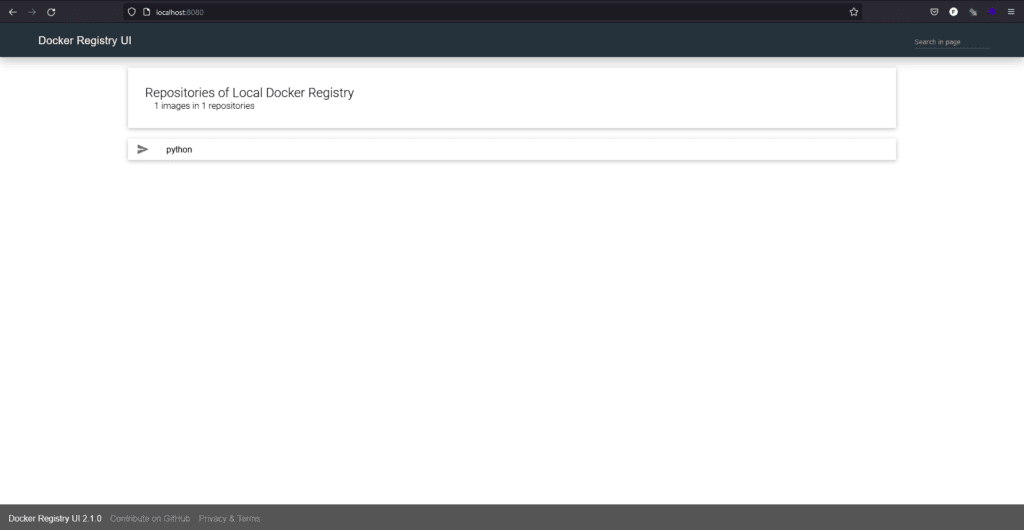
If we want to put there an image, for instance the Python 3.9.10 in the Slim Buster version, those are the commands we need to execute in our terminal:
docker pull python:3.9.10-slim-buster
docker tag python:3.9.10-slim-buster localhost:5001/python:3.9.10-slim-buster
docker push localhost:5001/python:3.9.10-slim-buster
The first line pulled the latest Python 3.9.10 Slim Buster image from Docker Hub. The second one tagged it for our local Docker repository. The third and last one pushed the image to our Docker local repository. You can see the new image by refreshing the GUI webpage.
And from here you can go ahead by yourself! Any time you want to pull the Pyhton image from your local repository, all you need to do is to use this command:
docker pull localhost:5001/python:3.9.10-slim-busterBy the way, if you click on the Python image in the GUI you will reach another webpage where you can copy the command above. Using this image as reference in your Dockerfiles (for instance, to install Python libraries) will help to speed up your development cycles.
And if you push to your local registry some image with dependencies already installed, will speed it up even more, as you can use those other half-baked images in further iterations.
Related links
- Docker Registry documentation
- Docker Registry official image link
- joxit Docker local Registry GUI webpage
- joxit Docker local Registry GUI official image link
- Github repository with full example link
Do you like our content? Check more of our posts in our blog!