TL, DR
Minio is a powerful open source self-hosted object storage, similar to S3, that you can deploy on your own hardware or cloud instance. This guide provide you the right settings to deploy Minio with Dover on a Synology NAS and use your domain name with SSL
Minio object storage
We already covered Minio in details in another post, including why it’s a great option for your projects that may need object storage. This time we will get Minio up and running on a Synology NAS, with your own domain name.
Prerequisite work
Before getting Minio to work with your own domain name and SSL on a Synology NAS, there are a few preliminary operations. I will just list those and provide links to other guides to perform those steps.
- Register a Synology DDNS subdomain – guide link
- Install Docker and Portainer – guide link
- Activate a wildcard certificate with Let’s Encrypt and configure reverse proxy – guide link
- Configure your local DNS to use HTTPS URLs from within your local network – guide link
Deployment guide
Create folders
You will need to create the following folder structure inside your Docker folder:
docker
|__minio
  |__config
  |__data
Only use lowercase letters for your folders.
Setup continuous Let’s Encrypt certificates copy
In order to use your Let’s Encrypt certificate for Minio, you’ll need to create a job to continuously copy the certificates, as those will be regularly refreshed. You can easily do so with a Scheduled Task in your Synology.
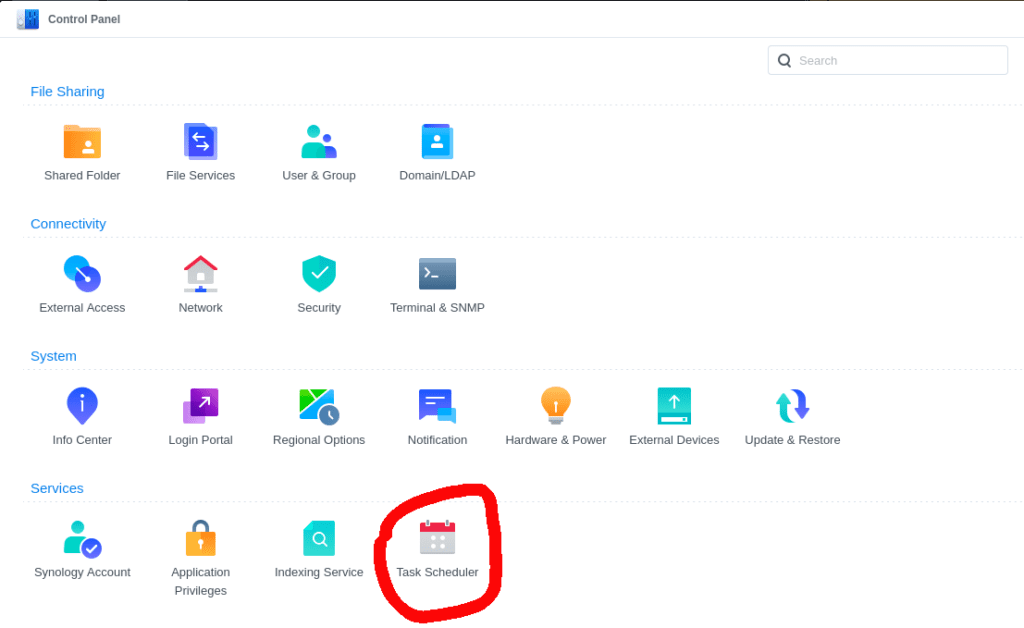
From your DSM portal select Control Panel >> Task Scheduler.
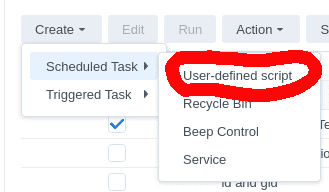
You will need to select Create >> Scheduled Task >> User-defined script, as in the following image.
Give a name to your task and select the root user for execution, as the certificates are not accessible to others – including administrators.
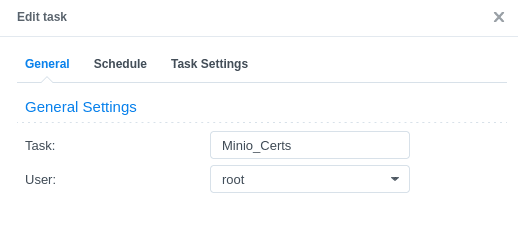
In the Schedule tab choose a reasonable frequency (I have put Every hour), then in the Task Settings tab use the following code as User-defined script:
cp -f /usr/syno/etc/certificate/_archive/$(cat /usr/syno/etc/certificate/_archive/DEFAULT)/privkey.pem /volume1/docker/minio/config/certs/private.key && cp -f /usr/syno/etc/certificate/_archive/$(cat /usr/syno/etc/certificate/_archive/DEFAULT)/fullchain.pem /volume1/docker/minio/config/certs/public.crtI suggest you to run your task once, and check in the file explorer that the certificates are copied inside the folder you created in the previous step.
Reverse proxy setup
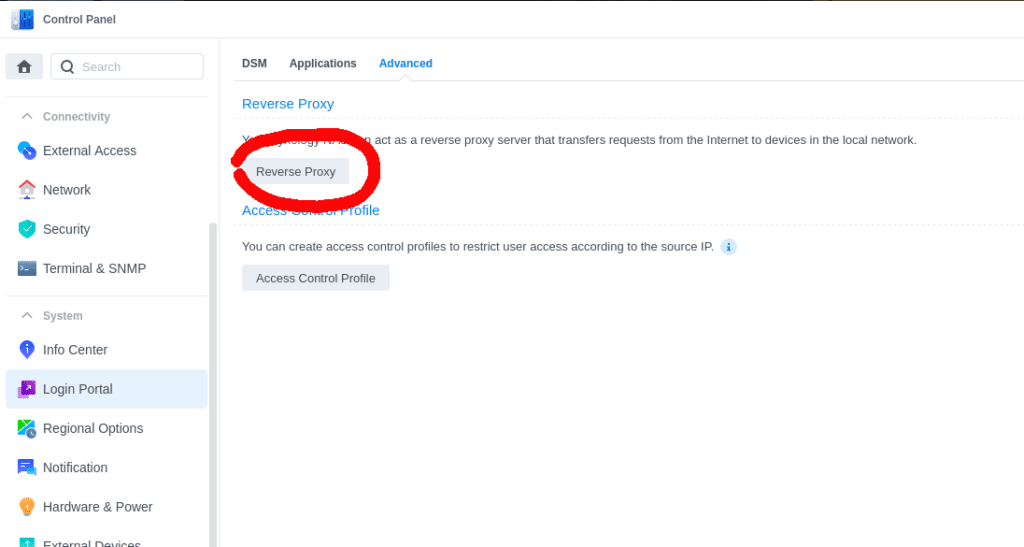
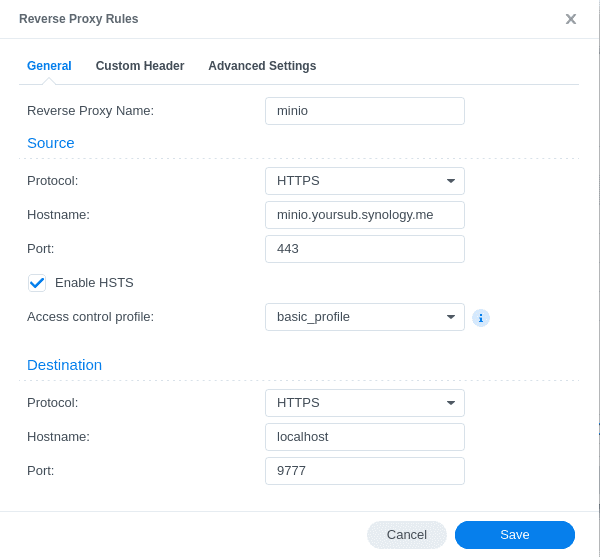
Now it’s time to create your reverse proxy setting in order to use your subdomain for Minio. Go to Control Panel >> Login Portal >> Advanced, and click on Reverse Proxy.
We need to create two reverse proxy rules, one for Minio API and another one for Minio Console. Note down the ports you select, as they’ll need to match with the one we will enter later in Docker compose – in this case port 9777 for Minio API and 9701 for Minio Console.

Docker Stack
In your Portainer UI you should go to Stack >> Add stack in order to create a new deployment template. Keep the option Web editor and paste the following code:
version: '3'

services:
  minio:
    image: minio/minio
    ports:
      - "9777:9777"
      - "9701:9701"
    volumes:
      - /volume1/docker/minio/data:/data
      - /volume1/docker/minio/config:/root/.minio
    environment:
      MINIO_ROOT_USER: YourOwnUser
      MINIO_ROOT_PASSWORD: YourOwnPasswd
      MINIO_BROWSER_REDIRECT_URL: "https://mc.yoursub.synology.me"
      #MINIO_SERVER_URL: "https://minio.yoursub.synology.me"
      MINIO_API_DISABLE_ODIRECT: "on"
    command: server --address ":9777" --console-address ":9701" /data
You need to replace the values for MINIO_ROOT_USER , MINIO_ROOT_PASSWORD, and MINIO_BROWSER_REDIRECT_URL with your own. Also for the ports, you can select different one, as long as those are aligned with the reverse proxy selected above.
As a note, I commented out the MINIO_SERVER_URL environment variable, as it was creating login issues on my side.
Once you are done, you can click on Deploy the stack and go to the address for testing everything works!
Related links
- Mino Object Storage – link
- Register a Synology DDNS subdomain – link
- Install Docker and Portainer – link
- Activate a wildcard certificate with Let’s Encrypt and configure reverse proxy – link
- Configure your local DNS to use HTTPS URLs from within your local network – link
Do you like our content? Check more of our posts in our blog!